

 Camera self help articles
 Category Widget (Show all)
1) Preface
It is amazing to see how quickly the world is changing around us. What seemed to be intact and perfect just several years ago is getting destroyed by us humans. One of the reasons why I fell in love with photographing nature, is because it is not only my way of connecting with nature, but also my way of showing people that the beauty around us is very fragile and volatile. And if we dont take any action now, all this beauty will someday cease to exist, not giving a chance for our future generations to enjoy it the same way we can today. Hundreds of movies have been filmed, thousands and thousands of great pictures taken and yet the world is not listening. What can we do and is there hope? It is very unfortunate that we only act when a disaster of a great scale hits us and the unbalanced force of nature enrages upon us. But we as photographers must continue to show the world the real picture out there the deforestation of our rich lands, the pollution that is poisoning our fresh waters and causing widespread diseases, the melting of glaciers, the extinction of species and many other large-scale problems that are affecting the lives of millions of people and animals around the world. Therefore, it is our responsibility as photographers to show the real picture.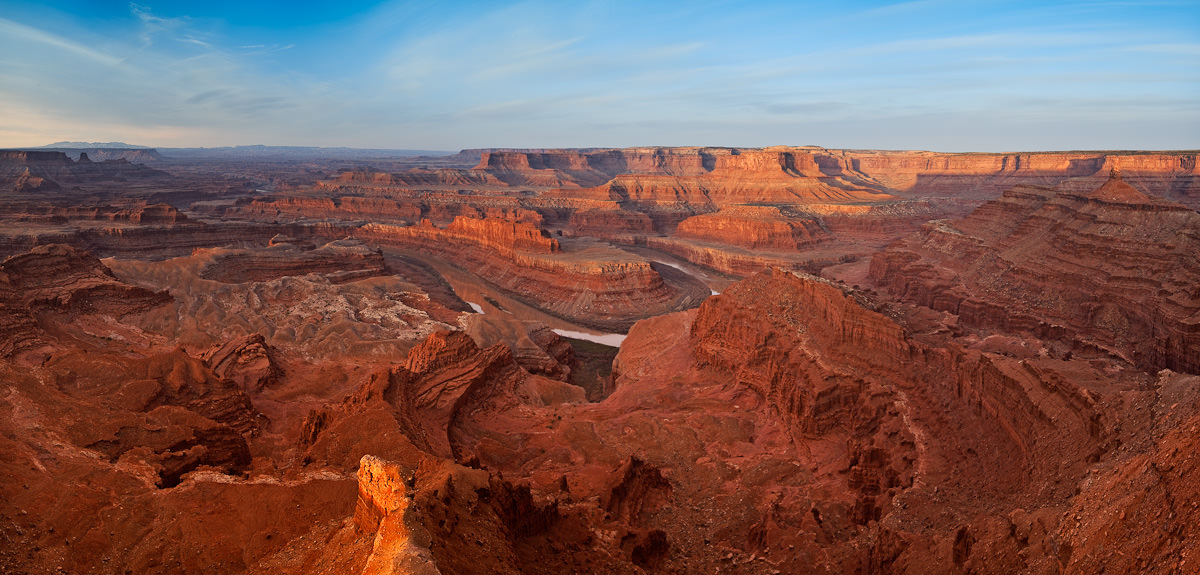
2) Introduction to Landscape Photography
Landscape photography is a form of landscape art. While landscape art was popularized by Western painting and Chinese art more than a thousand years ago, the word landscape apparently entered the English dictionary only in the 19th century, purely as a term for works of art (according to Wikipedia). Landscape photography conveys the appreciation of the world through beautiful imagery of the nature that can be comprised of mountains, deserts, rivers, oceans, waterfalls, plants, animals and other God-made scenery or life. While most landscape photographers strive to show the pureness of nature without any human influence, given how much of the world has been changed by humans, depicting the nature together with man-made objects can also be considered a form of landscape photography. For example, the famous Mormon Row at the Grand Teton National Park has been a popular spot for photographing the beautiful Tetons in the background, with the old barns serving as foreground elements.Photographing landscapes involves three key elements: photo equipment, skill/technique and light. Lets look at all three elements one by one.
3) Photo Equipment
Good and reliable photo equipment is extremely important to achieve the best results for landscape photography. If your camera can take exceptional photographs, but cannot withstand extremely cold or hot temperatures, it will certainly limit you in what you can do. Therefore, it is best to have a camera that can both take good pictures and withstand tough weather conditions. Why is the latter important? Because some of the best landscape photographs are taken in very challenging weather during a storm, after a heavy snowfall, early in the morning at below freezing temperatures, etc. Take a look at the following picture of sand dunes that I captured last year:
A desktop wallpaper version of the above image can be downloaded from here.
At first, you might think that the weather was nice and pleasant when I captured this photo. But the reality of the situation was quite the opposite it was extremely cold and windy, with the sand hitting me on my face like those icy snowflakes hit you when you ski. The Nikon D700 I carried that day suffered pretty badly, with the sand piling up in every dent and hole. My Nikon 24-70mm zoom ring was full of dust and I remember the screeching sound I had for months, because I could not get the sand out of it. My 24-70mm is still alive today and I have taken over 200,000 pictures with my D700 and it is still working perfectly fine. And this is just one example; I abused my camera gear like that countless times and always relied on it in the most challenging situations.
What about camera capabilities? No matter how weather-resistant your camera is, it must be able to deliver images that are sharp and vibrant, with good contrast. Thats where having a camera with a large sensor/film, good support and a selection of good lenses/filters is important. Lets talk about the gear in more details.
3.1) Camera Selection Film or Digital?
The question of digital vs film is a never-ending debate and I do not have any intentions to bring up another heated debate over which one is better. I will simply state what is true for landscape photography today and what works best. If you want to print wall-sized pictures, film is the way to go at the moment. To get an equivalent of medium format film, you would need to get a 40-50+ Megapixel medium-format digital camera that starts at around $20-25K+. Even then, many photographers claim that medium format digital does not have the same dynamic range as medium format film. Check out this great Digital vs Film article from Wikipedia that explains this in more detail, with advantages and disadvantages of both. Combining medium/large format together with good post-processing skills (more on that below) can yield exceptionally sharp and colorful commercial-grade results. But film is certainly not for everyone, since it has its own challenges and the cost of owning and operating a film system can get quite high overtime.
3.1.1) Film Systems
There are many different film systems out there at different price points that all work great. If you shoot medium format, Mamiya, Rollei and Hasselblad medium-format systems are quite popular. There are many large format systems out there and the more popular ones seem to be by Sinar and Linhof, but there are many more great choices and sizes. The selection of lenses for both medium and large format systems is also huge with big names such as Nikon, Rodenstock and Schneider providing a good selection for all kinds of needs.3.1.2) Digital Systems
Despite the above-mentioned advantages of film, small format digital is the most popular system for photographing landscapes today. Easiness of use, low cost, relatively short learning curve, immediate results, free unlimited exposures and much shorter post-processing time are the reasons why small format (full-frame and cropped sensor) systems became so popular. An entry-level DSLR with all required accessories for photographing landscapes can be purchased for under $1,000 today. To get around the problem of large prints, photographers employ special digital techniques to stitch single-row and multi-row frames to get largepanoramas and some even combine bracketing and stitching hundreds of frames to create High Dynamic Range Panoramas. Obviously, multi-row panoramas do not always work, especially for sunrise/sunset shots where light changes quickly and clouds move too fast, but single-row panoramas generally work quite well for the most part. Here is an example of a single-row panorama:
A desktop wallpaper version of the above image can be downloaded from here.
The popularity of small format digital cameras and the latest technology developments allowed some camera manufacturers like Hasselblad, Phase One and Mamiya to retain their image in medium format niche and create large sensors with lots of pixels, for those who do not want to bother messing with film. These expensive camera systems are primarily targeted for landscape and fashion photography, where large print size is important. As I have pointed out earlier, these systems are extremely expensive and only a few photographers can afford such high-end cameras.
The second best alternative to medium format today is 35mm or full-frame digital cameras. Nikon D3x, for example, is currently considered to be the top choice for landscape photographers that have budgets less than $10K. Some photographers even compare it to medium format quality and websites such as DxOMarkplace D3xs sensor performance higher than most medium-format sensors in terms of dynamic range and color depth. The 24mp sensor of the Nikon D3x can deliver exceptionally good images that can print as large as 14×20 inches at 300 PPI. With some good photo enlarging techniques, you could easily double that print size without much loss of detail.
For those on tighter budgets, cheaper full-frame/cropped sensor cameras are less preferred, but most popular choice for landscape photography. Most popular because of cost and less preferred because low price means less ruggedness/minimal weather-sealing and in most cases, less dynamic range and color depth. Lets look at both. As I have stated earlier, you could buy a brand new entry-level DSLR with a lens, a tripod and all other accessories for under $1,000. At this price point, I know that many film shooters will claim that you might as well go with cheap film and get a lot more resolution and print sizes, which is true a 35mm film camera will give you larger prints than a 12 Megapixel digital camera. However, the biggest issue is convenience, or lack thereof, and complexity of use film requires time-consuming development (which you could do for less than $5 a film) and if you needed to post-process images in Photoshop, you would need to scan it first. Since you cannot see what you are photographing, you need to be relatively good with the equipment and need to know how to control the exposure. I typically post images from my trips on my blog as soon as I come back and sometimes even while Im on the road. I import my images into Lightroom, spend very minimal time editing images and then directly post them to my blog online. With film, this process would have been considerably longer. What about construction and weather sealing? Cheaper DSLRs have much less resistance (or none) to tough weather conditions and you have to be extra careful while photographing in dust, under rain/snow and sub-zero temperatures. Cropped-sensor DSLR cameras also generally have less dynamic range and color depth, due to their small sizes.
To sum it all up, here is how I would categorize cameras, in the order of preference for landscape photography:
- Large format/Medium format film cameras
- Medium format digital cameras
- High-resolution full-frame digital cameras such as Nikon D3x and Canon 1Ds Mark III
- Lower cost full-frame digital cameras such as Nikon D700, Canon 5D Mark II and Sony Alpha A900
- High-end cropped-sensor cameras such as Nikon D7000, Canon EOS 60D and Sony Alpha A580
- Low-end cropped-sensor cameras such as Nikon D3100, Canon EOS T1i and Sony Alpha A33
Lets now move on to lenses a key part of the photography setup for landscapes.
3.2) Lenses and why they are important
No matter how good your camera is, if the lens you have mounted on it is poor, you will get equally poor results. Lenses are like your eyes if you have bad vision, the picture you see is going to be soft and blurry. Therefore, it is extremely important to use lenses that have high contrast, great color reproduction and sharpness across the frame. When photographing portraits, the corner performance of the lenses is typically not important your subject is going to be close to the center of the frame most of the time. However, when it comes to landscape photography, corner sharpness becomes almost equally important as center sharpness, since foreground elements can be located on the lower frame and sometimes touch corners. Thats why I pay a lot of attention to corner sharpness in my lens reviews.While selecting lenses, you have two selections zoom lenses and prime/fixed lenses. For landscape photography, prime lenses used to be the number one choice (and still are for large/medium format film). However, with the latest advancements in optical technology, manufacturers are able to produce exceptionally good zoom lenses that match and sometimes even surpass the quality and sharpness of prime lenses. For example, the legendary Nikon 14-24mm (although not the top choice for landscapes due to inability to support external filters) is the sharpest ultra-wide angle zoom lens that is actually sharper than most other Nikon prime lenses in the 14mm to 24mm focal range. Zoom lenses have a big advantage over prime lenses due to their ability to zoom in/out, which I personally find very important for landscape photography. I have been in many situations, where I had to stand at a particular spot and could not move to frame my shot. Without a zoom lens, I would have to crop a lot, which would negatively affect my ability to print large. So you have to weigh in these factors for your landscape photography. I personally carry both with me, which gives me greater flexibility.
For large and medium format, prime lenses are the way to go. For full-frame and cropped sensor formats, the landscape photography world is divided to 2 parts those who shoot Zeiss prime lenses and those who shoot everything else. Zeiss lenses are popular for their sharpness and color rendition, but they are all manual focus lenses (Nikon and Canon mount), which means that you have to know how to properly manually focus the lens under different conditions. Gladly, most landscape photography is shot at infinity, so it is usually not a problem. Some landscape photographers swear by Zeiss glass and others like me are fairly comfortable working with other brand lenses. I personally prefer Nikon lenses, but do not have a problem using Sigma or Tamron lenses.
3.2.1) Best Lenses for Landscape Photography
So, what are the best lenses for landscape photography? I personally do not have much experience with large and medium format lenses, so I will only talk about lenses for 35mm film and full-frame/cropped sensor cameras. In terms of brands, I will only include Nikon and Canon, because the list can get pretty long if I include others.3.2.1.1) Best Nikon FX Lenses for Landscape Photography
Here is the list of lenses that I personally consider to be the best for Nikon format, in my subjective view:- Nikon 24mm f/1.4G the sharpest Nikon lens you can find today. Exceptional detail, color rendition and high contrast make this lens my #1 choice for landscape photography. I really like working with the 24mm focal length and I find it to be wide enough for most situations. Its biggest drawback is the fixed focal length, which means that you will have to move a lot to properly frame your shot. Read my Nikon 24mm f/1.4G Review.
- Nikon 24-70mm f/2.8G my second most favorite lens for photographing landscapes. It does have a few problems, specifically some distortion at 24mm and corner softness when shooting at large apertures, but since I shoot at f/8 and higher most of the time, this is not that big of a deal for me. Distortion is easy to fix in Lightroom, especially with the Lightroom 3 Lens Correction feature that fully supports this lens. In addition, the lens is built like a tank and can withstand pretty much any challenging weather. I have used it extensively in all kinds of cold/moist/sandy conditions and it has never failed me once. Read my Nikon 24-70mm f/2.8G Review.
- Nikon 70-200mm f/2.8G VR II for longer-range telephoto shots, the 70-200mm is the best lens you can find. It is sharp across the frame and the color rendition is top of the class. I always take the 70-200mm with me and use it quite a bit, even with teleconverters. Read my Nikon 70-200mm f/2.8G Review.
- Nikon PC-E 24mm f/3.5D Tilt/Shift a special purpose tilt/shift lens that can be immensely helpful for photographing landscapes. It allows you to change perspective directly on the camera, delivering results no other regular lens can. The lens certainly requires some skill to use it properly.
- Nikon 24-120mm f/4G VR a cheaper alternative to the 24-70mm. I have recently used this lens for some landscape work and found the extra focal length and VR to be very useful when compared to the 24-70mm. Its construction and weather resistance are certainly much weaker than of the 24-70mm. I dont think it would survive a hit on the front side of the lens when it is extended, so I would use it with care. Similar to the 24-70mm, it also has some corner softness, distortion and vignetting, although the latter is certainly better controlled on the 24-70mm. Read my Nikon 24-120mm f/4 Review.
- Nikon 16-35mm f/4G VR another relatively inexpensive lens with excellent sharpness and color rendition. It is a great choice for situations, where you need to go wider than 24mm and would be a great lens to go with the 24-120mm. I found the older 17-35mm f/2.8D to be softer in the corners at large apertures, so given the cost of the 17-35mm, it is no longer in my list of the best lenses for landscape photography. Read my Nikon 16-35mm f/4 Review.
There are many more lenses that work great for landscape photography (including great Zeiss Distagon lenses), but I personally do not have much experience with them, so I cannot comment on their performance. Please feel free to provide your recommendations from your own personal experience.
3.2.1.2) Best Nikon DX Lenses for Landscape Photography
Although all of the above FX lenses would work perfectly fine on DX, the field of view is changed due to the sensor crop factor and such lenses as Nikon 24-70mm might feel a little too long on DX. In addition, DX lenses are generally much cheaper than their FX counterparts and also weigh less. Lets take a look at the best DX lenses for landscape photography (again, based on my subjective opinion):- Nikon 12-24mm f/4G DX I used to own and love this lens for my landscape photography for a while (until it got stolen). It is an exceptionally sharp lens that is capable of delivering great contrast and color across the focal range. It can take 77mm circular filters, but I would be careful with using large filters at 12mm the lens will vignette heavily.
- Nikon 10-24mm f/3.5-4.5G DX a great alternative that will give you even wider perspective at a lower cost.
- Nikon 16-85mm f/3.5-5.6G another great lens with a wider perspective and longer focal range than the 17-55mm. While it is much slower than the 17-55mm lens, its performance is impressive, with the weakest performance on the short side at 16mm. Stopped down to f/8.0, the lens is great across the frame.
- Nikon 17-55mm f/2.8G an expensive, but pro-level lens that is capable of delivering great results even wide open. Its performance tops at f/8.0, where the corners look almost as good as the center.
- Nikon 35mm f/1.8G DX the only prime lens that made it to this list, the Nikon 35mm f/1.8G is a great lens that is sharp across the frame. Stop it down to f/8.0 and it will produce better results than any other DX zoom lens. The only downside is its focal length due to the 1.5x crop factor, it falls into a standard lens category at ~52mm, which is often not wide enough.
3.2.1.3) Best Canon EF Lenses for Landscape Photography
Although I personally do not shoot Canon, I have many friends that use Canon DSLRs for landscapes. Here is the list of Canon lenses they recommend for landscape photography:- Canon 14mm f/2.8L II top choice for super wide angles, the 14mm f/2.8L is extremely sharp across the frame. Contrast and colors are exceptional.
- Canon 17-40mm f/4L one of the top choices for landscape photography, both in terms of price and performance. It is known to be sharper in the corners than Canons 16-35mm f/2.8L lens, which is more expensive than the 17-40mm.
- Canon 24-70mm f/2.8L a great overall lens for landscape photography. Also has some problems with distortion and vignetting, but gets much better at smaller apertures.
- Canon 70-200mm f/2.8L IS II superb optics, exceptional image clarity and sharpness across the frame for longer-range telephoto shots.
- Canon 24-105mm f/4L IS similar to the Nikon 24-120mm f/4G VR, the Canon 24-105mm f/4L is an overall superb lens with a very useful focal range. It also suffers from some corner softness, distortion and vignetting wide open, but gets much better stopped down.
- Canon 24mm f/3.5L Tilt/Shift a special purpose tilt/shift lens for Canon format that is similar to Nikons PC-E 24mm f/3.5D.
- Canon 70-200mm f/4L IS a lower-cost and a much lighter/smaller alternative to the 70-200mm f/2.8L, the Canon 70-200mm f/4L is a great lens for photographing distant subjects.
3.2.1.4) Best Canon EF-S Lenses for Landscape Photography
Here are some of the best Canon EF-S lenses for landscape photography:- Canon EF-S 10-22mm f/3.5-4.5 a great lens that is similar to Nikons 10-24mm in terms of performance.
- Canon EF-S 17-55mm f/2.8 IS also similar to Nikons 17-55mm f/2.8G DX, the Canon 17-55mm f/2.8 is a very popular Canon lens that is sharp across the frame. Color and contrast are pro-level.
3.3) Camera Support Tripods
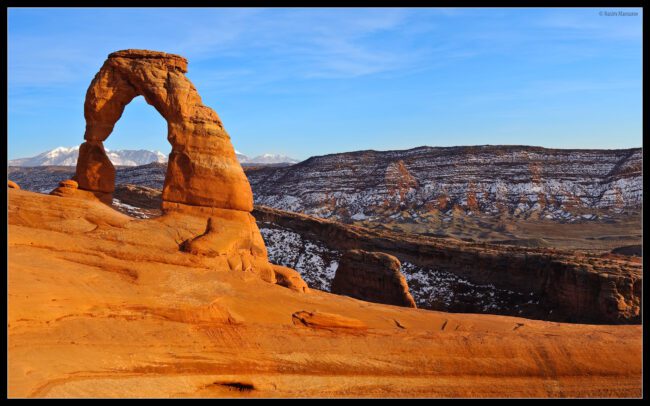
A landscape photographer without a tripod is a handicapped photographer. Although modern cameras such as Nikon D3s are capable of producing high-quality images shot at high ISO sensitivities, some images are impossible to capture without good support. For example, it is impossible to photograph the night-time sky with stars without a tripod. Another example is taking pictures of moving water at slow shutter speeds of several seconds. Basically, any photography at slow shutter speeds of 1 second and longer must be taken with a tripod. Here is a recent example that would not have been possible without using a tripod:
A desktop wallpaper version of the above image can be downloaded from here.
The above image was shot at a shutter speed of 30 seconds at ISO 800 there is no way I would have been able to capture this shot hand-held.
While these examples show cases when you might need a tripod, I personally consider a tripod a must-have tool, rather than an optional accessory. I once talked to a well-known landscape photographer about camera support and I stated that I prefer to shoot my landscapes hand-held when there is plenty of light. In response, he told me that he could not think or compose until he puts his camera on a tripod, even when shooting with a digital SLR on a bright day. It was shocking to hear what he said and I kind of criticized him in my head, but then as I continued to learn more and shoot more, I realized that what he said actually made a lot of sense. I went back and looked at my images shot hand-held and realized that many of them were badly aligned and many shots were either blurry because of camera shake or had too much grain due to increased ISO. Lately, I started taking my tripod with me everywhere and pretty much started doing the same thing putting my camera on a tripod before taking pictures. My images improved in their quality significantly and I now spend even less time post-processing in Lightroom/Photoshop.
One last thing I wanted to suggest, is to get yourself a remote shutter release. Tripods do a great job in reducing camera shake, but since you are the one who presses the camera shutter, you could introduce additional vibration. For situations when you need to use a slow shutter speed (as described above), a remote shutter release can help eliminate camera shake. Entry-level and some of the semi-professional DSLRs have infrared remote shutter releases that are very cheap, typically under $50. If you use a professional camera, you will most likely have to get a more expensive cable release, which will run between $70 to $250, depending on the model and features.
If you want to find out more about tripods and if you need help choosing a good tripod for your photography, check out my how to buy a tripod article.
3.4) Filters and why they are important
Lets now move over to filters. As you have seen earlier, I excluded the excellent Nikon 14-24mm f/2.8G lens from the list of best lenses simply because it cannot take regular filters, which shows how important I personally think filters are for landscape photography. Any experienced landscape photographer will tell you that filters are an essential and integral part of landscape photography. Some shots are simply impossible to capture without specialized filters. There are three types of filters that I personally classify as requirements for landscape photography: Circular Polarizing Filter, Neutral Density Filter and Graduated Neutral Density Filter. Lets take a look at each one individually.3.4.1) Circular Polarizing Filter
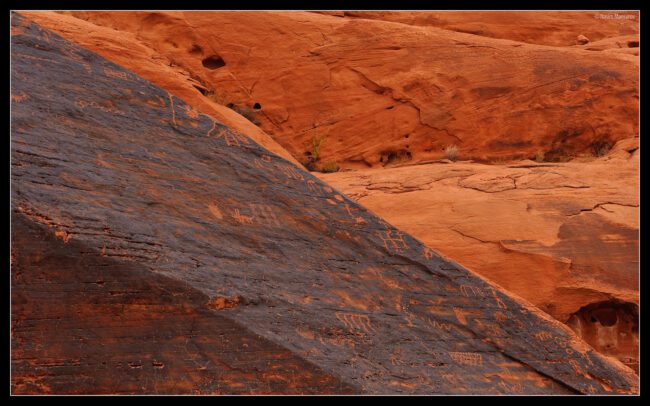
Landscape photographers heavily rely on Circular Polarizing Filter (CPL) for three reasons the filter removes reflections from objects, which adds more contrast and color to images, it reduce haze on distant subjects and finally, it darkens the sky and brings out the clouds. As you might have noticed, I personally use the CPL a lot for my landscape photography. Here is a shot that I took with a polarizing filter: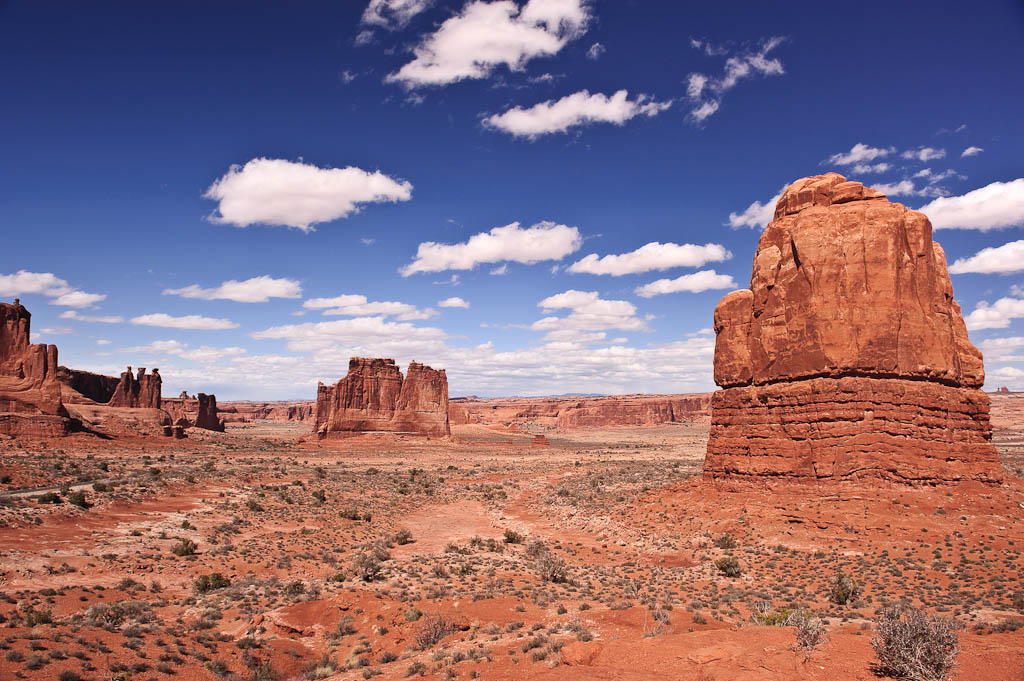
A desktop wallpaper version of the above image can be downloaded from here.
See how blue the sky is and how white the clouds are? This shot would have looked completely different if I had not used a circular polarizer. Here is an example of a shot where the polarizer helped me to reduce haze and remove reflections from water:
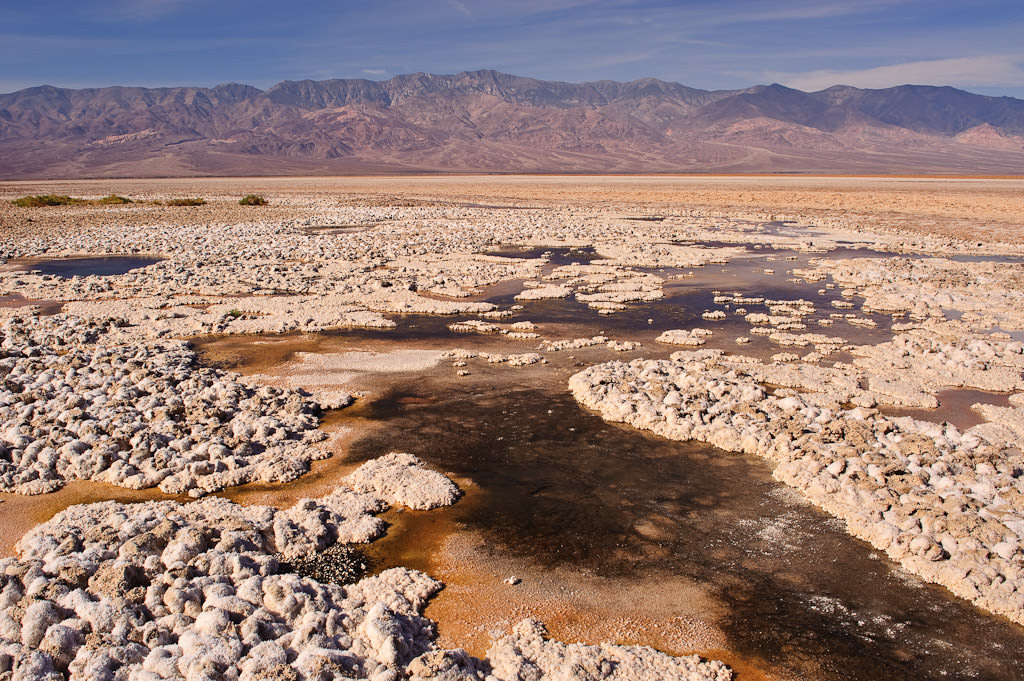
A desktop wallpaper version of the above image can be downloaded from here.
Without a polarizer, the image would have looked horrible the distant mountains would look very hazy and cloudy, while the reflections on the water would not have allowed me to show the darkness underneath.
Polarizing filters can be challenging to use, especially for those who have never used them before. You also have to be very careful when deploying them on wide angle lenses. If you want to know more about polarizing filters, I have written a detailed article on how to use polarizing filters, with plenty of examples and useful information.
3.4.2) Neutral Density Filter
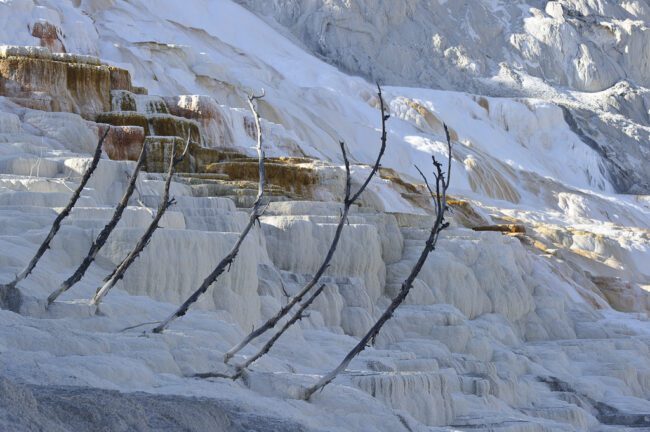
Do you know how images of waterfalls with silky and smooth-looking water are captured? For most such shots, photographers use Neutral Density (ND) filters that only let very little light through (or better put, reduce the intensity of light), which basically slows down the exposure. Without a filter, you would have to increase the F-number to let less light through the lens. However, if you are shooting on a bright day, increasing the F-number would not help much, since there is too much light you would either end up with an over-exposed image or the effect of the water blur would be minimal/unnoticeable.Using a dark neutral density filter requires a good support system, since the shutter speed will decrease significantly, based on how much light the ND filter lets through. For example, a 6 stop ND filter by B+W that I personally use only transmits 1% of the light. With this little light getting through, the scene looks very dark when I look through the viewfinder and yet surprisingly, autofocus is still operational. 6 stops means that if I were shooting a scene at 1/250th of a second @ f/8.0 without a filter, the shutter speed would drop down to 1/4th of a second as soon as I mount the 6 stop ND filter on the lens. I could then further reduce my shutter speed by increasing my aperture to f/11 or more, if I needed longer shutter speeds for whatever reason. Here is an example of a waterfall that I captured using the ND filter:
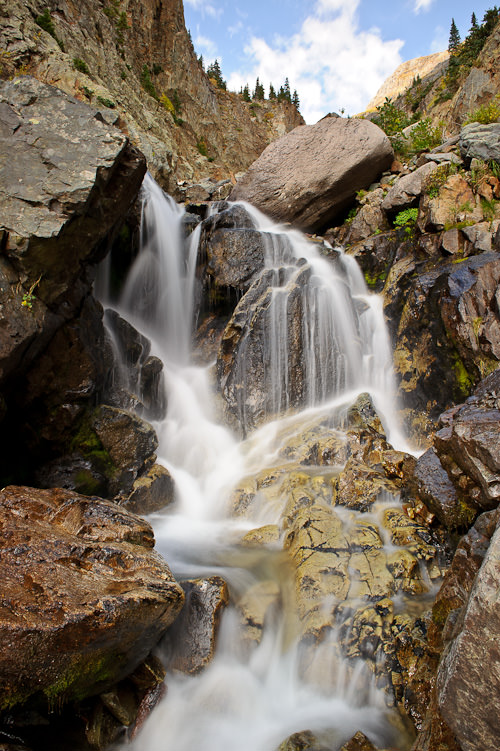
As you can see, the image was shot during the day and yet the water looks silky in the photo, due to a slow shutter speed that I was able to get thanks to the 6 stop ND filter.
3.4.3) Graduated Neutral Density Filter
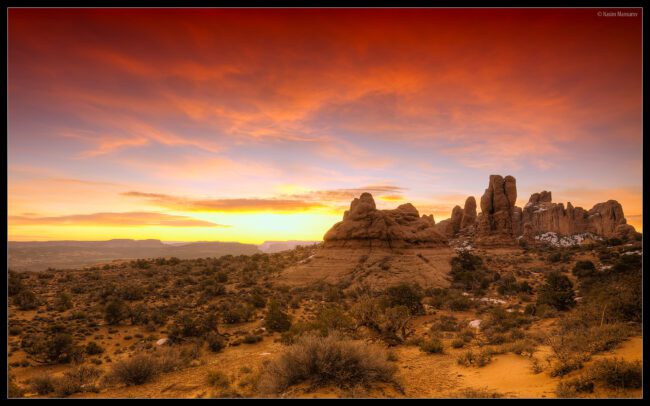
Graduated filters are similar to regular ND filters, except they gradually go from dark to completely clear. This gradual transition is important for landscapes, because it should only darken the brightest area of the scene without touching the darker parts of the scene such as the ground. Although a lot of photographers seem to be utilizing bracketing/HDR techniques to capture the full range of tones, I personally prefer to use Graduated Neutral Density (GND) filters whenever possible. For example, if I am photographing a sunrise or sunset and the sky is several stops brighter than the ground, I will use my 0.6 (2 stop) or 0.9 (3 stop) Graduated ND filter to darken the sky. Take a look at this shot:
To properly expose the sky, I used a two stop Graduated Neutral Density filter thats what added some of the blue to the sky. Without the filter, the sky was overexposed and looked completely white. I actually had to add another half a stop of Graduated ND filter through Lightroom, which made the sky a little darker (I shot in RAW, which preserved the darker tones). If I hadnt used any filters, my only choice would have been to shoot in brackets for HDR not something I wanted to do for this particular shot.
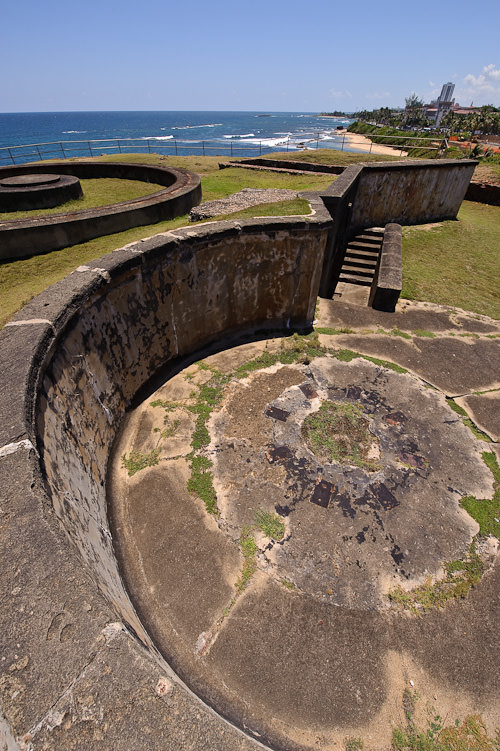
Similar to circular polarizing filters, you have to be careful when using GND filters, because you might end up darkening other parts of the image. Take a closer look at the above image you will see that both mountains on the left and right side of the top frame also got darker, which is not good and not something that is easy to fix in post-production
Another major problem with graduated neutral density filters, is that they cannot (and should not) be circular. Why? Because you should be able to control the point from which the scene will turn from dark into clear. In one scene, the sky might take up 20% of the image, while on another one with beautiful clouds it might take up 50% or more of the image. Thats where you will need to move the graduated filter up and down to accommodate different situations. In order to be able to do this, you will need a filter holder system with square or rectangular filters. I personally use the Lee Filter Holder system, but there are many others to choose from.
3.4.4) Recommended Filters
Here is the list of the filters I recommend and personally use:- B+W 77mm Kaeseman Circular Polarizing MRC Glass Filter
- B+W 77mm Neutral Density 1.8 Filter (6 Stops)
- B+W 77mm Neutral Density 3.0 Filter (10 Stops)
Filter Holder System by Lee Filters:
- Lee Filters Foundation Kit with a 77mm Adapter Ring
- Lee Filters 4×6 Graduated Neutral Density ND 0.6 Resin Filter
- Lee Filters 4×6 Graduated Neutral Density ND 0.9 Resin Filter
- Cokin P Filter Holder with a 77mm Adapter Ring
- Hitech 0.6 GND Soft Edge Filter
- Hitech 0.9 GND Soft Edge Filter
4) Photo Technique
Now that you know what camera gear you need, lets move on to the fun part photo technique, which is comprised of three parts: Camera Gear Technique, Composition and Post-Processing Technique. These three elements are all equally important in landscape photography and you have to master them all in order to be able to produce great-looking images that you could potentially showcase and even sell.4.1) Camera Gear Technique
The first thing you need to learn how to use properly, is obviously your camera. If you have never used a DSLR before, get prepared for an intensive learning process. Your first lesson is to understand how a DSLR camera works and what it consists of. Next, you need to master the exposure triangle, which I call the three kings Aperture, Shutter Speed and ISO. Once you get a good grasp of these individually, you need to then learn how they work together to create a picture. Next, I would learn about camera modes andmetering modes. Lastly, I would recommend skimming through your cameras manual to understand how to change the exposure and camera modes.A good starting point to learn the basics of photography is through my Photography Tips for Beginners page that contains a number of easy to understand articles.
If you are able to comfortably shoot in Manual Mode while being able to adjust the exposure by increasing/decreasing the ISO, your basic knowledge of the camera is pretty solid.
4.1.1) Camera Settings
What are the optimal camera settings for photographing landscapes? Here are the settings that I personally use and recommend (good for most DSLRs):- Camera Mode: Manual. Learn how to shoot landscapes in manual mode. Use the built-in camera meter to see if you need to increase or decrease the shutter speed.
- Aperture: Start at f/8.0 and increase the number based on how much of the foreground and background you need to keep sharp. Try not to shoot above f/11 (on DX) and f/16 (on FX) to avoid diffraction.
- Shutter Speed: Doesnt matter as much adjust the shutter speed based on what your camera meters. In some cases when you need to freeze or blur movement, you will have to keep the shutter speed low or high. You can do this by changing aperture or using ND filters.
- ISO: 100 or 200, whatever your cameras base ISO is. Many of the modern Nikon DSLRs have a base ISO of 200, while Canon DSLRs have a base ISO of 100. If you have a setting for Auto ISO on your camera, turn it off.
- Image Format: RAW and RAW only, if you want the best possible results. Set camera bit-rate to the highest number (if available). Many professional cameras allow shooting 14-bit RAW.
- White Balance: Auto, since it doesnt matter if you shoot RAW you can easily change White Balance in post-production.
- Color Profile: Again, doesnt matter due to RAW format. I personally leave it at AdobeRGB.
- High ISO Noise Reduction: Off, you should not be shooting at high ISOs anyway.
- Vignette Reduction: Off, best to deal with it in post-production.
- Autofocus: Move your autofocus from the shutter release button to a dedicated button on the back of your camera. Some entry-level DSLRs might not have this feature, but most do. Most Nikon DSLRs either have a dedicated AF-ON button or AE-L/AF-L button on the back of the camera that can be programmed for autofocus (D3100, D5000 and D90 can do this). You certainly do not want your camera to autofocus every time you press the shutter button, especially if you are shooting panoramas. By switching autofocus action to a dedicated button, you can focus just once and then shoot in a continuous sequence.
4.1.2) Depth of Field and Hyperfocal Distance
When you photograph landscapes, it is vital to understand the concept of depth of field very well. One of the biggest challenges of landscape photography is to master lens focus and make everything look acceptably sharp. Why is that a challenge, you might ask? Because optics have certain limitations and it is not always possible to bring everything from foreground to background into perfect focus, especially when some objects are very close and others are very far. A good way to illustrate this is to do a quick experiment with your eyes (as you have seen from my other articles, cameras and lenses work just like our eyes). You will need two objects that can stand on a flat surface a small and a large object (like dice and a box of playing cards). Place the larger object vertically about 10 feet away from where you are on a straight surface like a table. Then move back to your position and while holding the smaller object with your index and thumb fingers, extend your hand half way, pointing it towards the larger object. Focus your eyes on the smaller object. Note how blurry the background is and how blurry the larger object is, almost to the point where it blends with other background objects. Now, take the smaller object and place it by the larger object and move back again to your position. Take a look at the smaller object from this distance now. This time, you will notice that both objects look sharp to you and even if you move the smaller object a little away from the larger one, it will not make a difference. The larger object will not get completely blurred like it did when you looked at the smaller object from a close distance. This very simple experiment demonstrates how lenses focus and how subject distance impacts sharpness.While our eyes work like a fixed 50mm lens, camera lenses allow us to capture much wider perspectives, or allow us to get closer to our subjects. Without understanding the relationship between lens focal length, aperture and camera to subject distance, focusing for landscape photography can get rather difficult. For example, if you were photographing starfish on a beach from a close distance and wanted to get the background horizon to be equally sharp as the starfish, which would you focus on the starfish or the background? Would you be using a wide-angle or a telephoto lens to get both in focus? What aperture would you be using? A good landscape photographer should know answers to all of these questions and come up with the right solution to the problem. For example, I would have certainly used a wide-angle lens (since long focal lengths would only isolate the subject more), a relatively high aperture number between f/8 and f/16 and would have focused on an area somewhere between the starfish and the background. Where exactly would I focus? This is where you need to understand what hyperfocal distance is and how to find it.
What is hyperfocal distance? Basically, hyperfocal distance is the point where you should focus your camera to get the maximum sharpness. When you focus your camera on the hyperfocal distance, everything from half of the distance all the way to infinity will be in focus. For example, if my hyperfocal distance is 50 feet, everything from 25 feet to infinity will be in focus. My depth of field basically starts at 25 feet. Why is hyperfocal distance important? In the previous example with starfish, if I focused my camera on the starfish or the background (infinity), either the starfish or the background would have been blurry. I want both to look sharp, so if I knew where the hyperfocal distance is and I focused on it, I would have theoretically gotten both sharp. Obviously, my focal length, camera to starfish distance and aperture are all variables that play a huge role here, but you hopefully get the point. Some photographers give advice to focus somewhere in the middle, between the closest foreground object and the background at infinity, without knowing all variables. I would be careful listening to such advice, since you might end up with blurry images, especially if you shoot with film.
For those who shoot digital, here is a trick that works for me when I am too lazy to use a hyperfocal distance calculator. Simply focus on your background (infinity) and take a shot. Then look at the image at 100% on the rear camera LCD and scroll from the background to the foreground. The last point where your image looks sharp and starts transitioning to blur thats roughly your hyperfocal distance. Remember this spot, then focus on it, take a picture and then see if the image looks sharp across the frame.
If you want to know the precise location of the hyperfocal distance, there are plenty of websites and various applications for your phone that compute this for you. You can even print out a hyperfocal chart and carry it with you everywhere. If you use an iPhone, there are plenty of apps such as DOFMaster that serve this purpose.
4.1.3) Bracketing
When you face tough situations with the light, where you have a big contrast between the darks and the whites, shoot in brackets of 3 to 5 (depending on your camera capabilities). Bracketing not only allows you to try post-processing techniques like HDR, but also gives you options for better exposure. You might choose one exposure over another and then further work on it in Lightroom or Photoshop. You might pick some parts of one image and merge them with another image through masking in Photoshop or do things like exposure fusion.4.2) Composition and Framing
Composition is a key element of every type of photography, including landscape photography. Without good composition, pictures can look plain, lifeless and boring. How should you compose your images and are there any rules for composition? What is good and bad composition? How should you frame your shots? I get these kinds of questions from our readers every once in a while, so I decided to write about it in more detail.When it comes to composition and framing there are no real set rules per se. However, there are some guidances and suggestions that might help with composing and framing your images better. Here are some of my guidelines:
- Communicate and transfer the mood through your photographs every photograph should have a mood and a message to it. What are you trying to say? What is your story? What is the mood of your photograph? Will the viewer feel amused by the power of nature that you are trying to show, or feel crushed by the dark, dreadful clouds in your image? Or perhaps the viewer should just enjoy the beauty of the colors you are trying to show? Your image needs to be able to communicate and bond with the viewer, triggering his/her emotions.
- Scout the area beforehand you never know what might be around you. Scout the area before the best light kicks in and find the best spots to be in. How many times have you been in situations where the light is perfect, the subject is perfect, but you are standing in a bad spot? Avoid those kinds of problems by doing the homework early.
- Slow down and be patient if you are not photographing wildlife or other fast-moving elements, slow down and take time to compose your shot. Wait for the right moment, the right light and be patient. Take pictures, then wait more your best photo might be minutes or hours away.
- Align/level your photograph before taking a picture while composing, make sure that your frame is properly aligned. If it is not, you will have to align it in post-production and you will ultimately lose some of the image resolution. I personally use the horizontal and vertical lines inside my viewfinder to align my camera most of the time, which works great. Another tool I use occasionally is the virtual horizon, which works like a leveling tool. If you do not have a virtual horizon feature, you might want to get yourself an external level that goes on top of your flash hot shoe.
- Avoid placing your main subject in the center many beginners do this a lot and while in some cases it is OK to place your main subject in the center, you should avoid doing it repetitively.
- Rule of thirds Im sure you have heard of this one, but it kind of goes along with #2. Simply visually cut your image into three parts and move your subject away from the center, so that it intersects with some of the lines. If you have a horizon in your frame, you can place it horizontally at 1/3 or 2/3 of the frame for a better composition. Here is an example of an image where I used the rule of thirds:
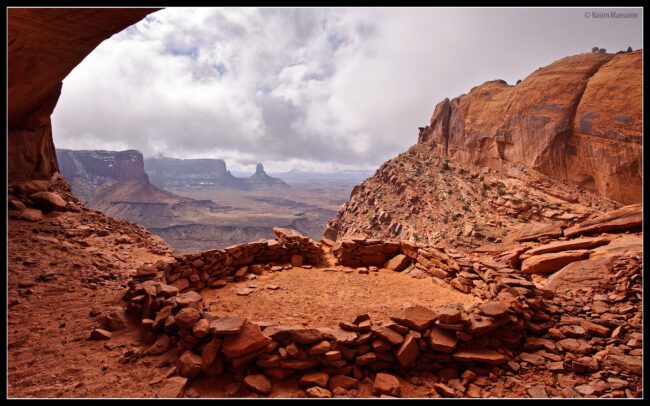
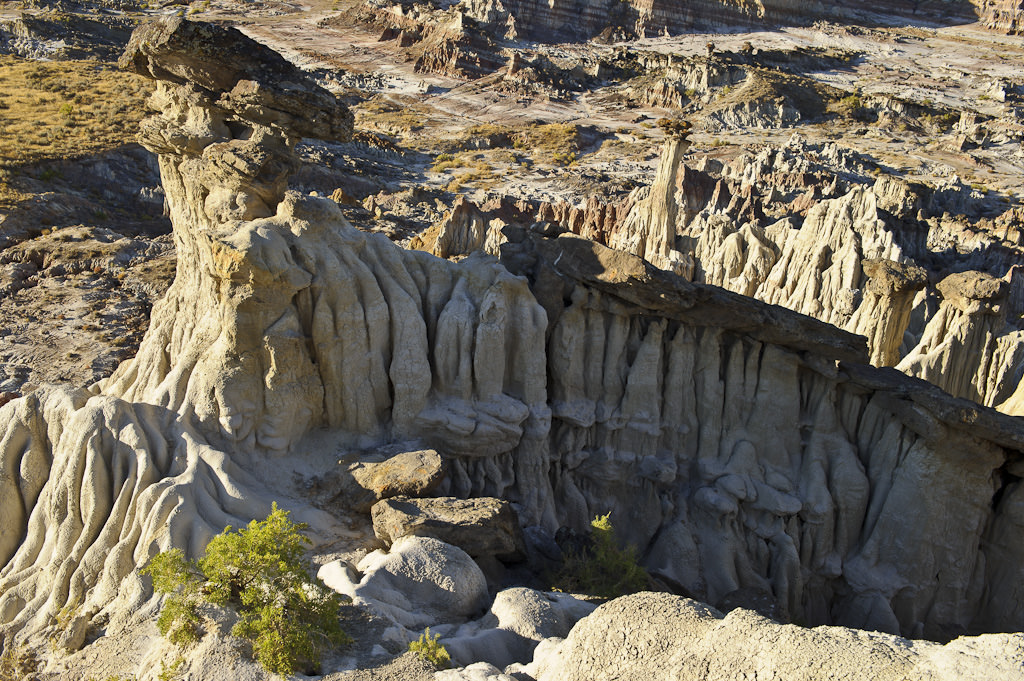
A desktop wallpaper version of the above image can be downloaded from here. - Center of interest/attention a photograph should contain a center of interest where you want the viewer to focus their attention on. Whether it is a tree, a bush or a house, there should be an element that instantly grabs the attention of the viewer. Here is an example, where the center of attention is the kiva in the lower bottom of the frame:
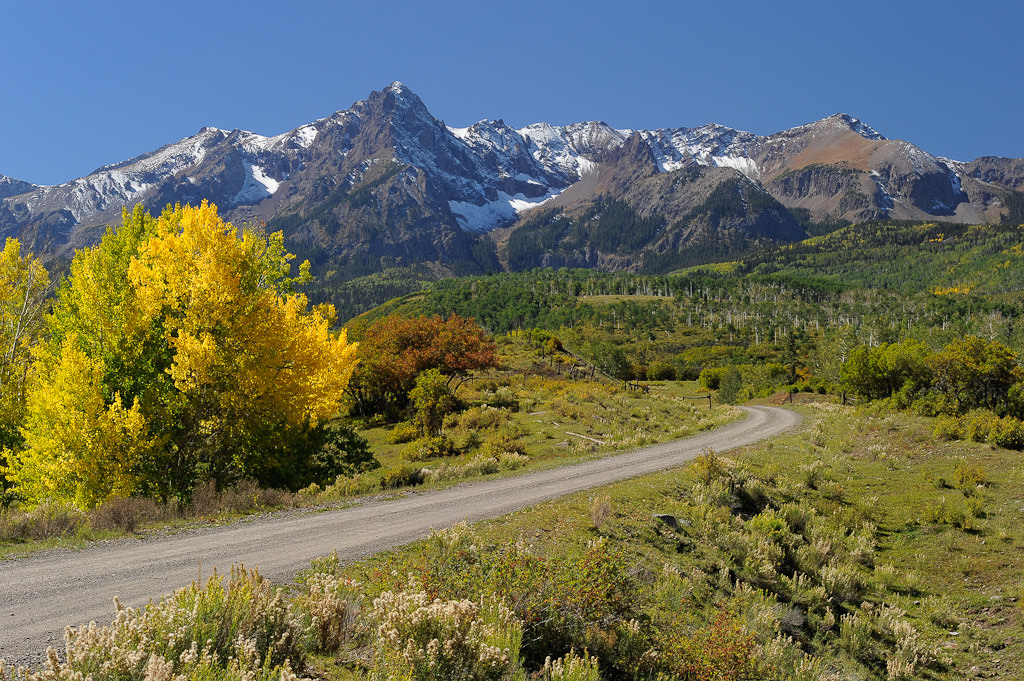
A desktop wallpaper version of the above image can be downloaded from here. - Exclude/avoid straight rivers, streams and roads instead of straight rivers and roads, try to locate curved ones, especially the ones with an S shape they look much more pleasing to the eye. Here is an example of a curved river:
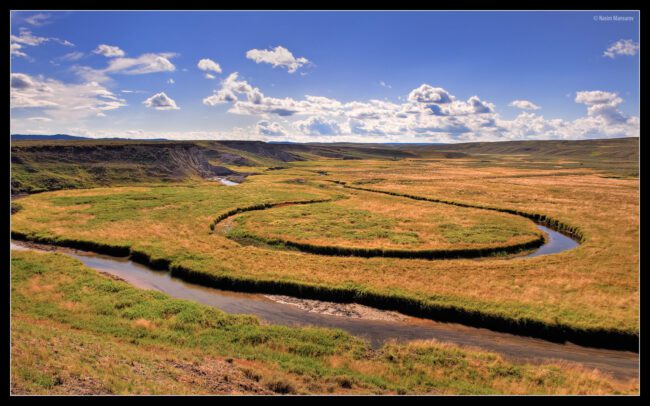
A desktop wallpaper version of the above image can be downloaded from here.
And here is an example of a curved road:

If the road was curved all the way, the composition would have been even better - When photographing mirror reflections, make sure that nothing disturbs the subject or its reflection I remember when I posted one of the images of Maroon Bells with a log in the reflection, one well-known photographer criticized the image, saying that I should not have included the log in the frame. Here is that image:

Besides being an over-cooked/over-saturated image, the big straight log that cuts through the image destroys the essence of the photograph, becoming an ugly part of the image (which at the time, I thought was a nice composition element). The attention of the viewer is no longer at the center of interest (which is the mountains and their reflection), but on the large log. After his rather harsh critique, I went back to the same spot and took another picture, but without any disturbing elements in the reflection and got this:
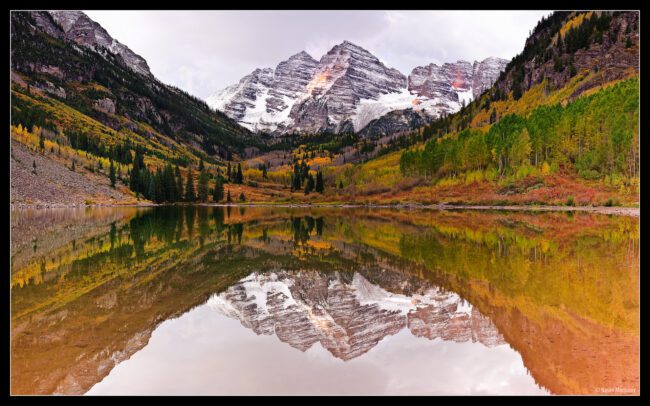
A desktop wallpaper version of the above image can be downloaded from here.
As you can see, the image certainly looks better and you can concentrate on looking at the beautiful mountains and their reflection, without getting disturbed by other unnecessary objects. - Balance your shot through symmetry one more thing to keep in mind when photographing landscapes, especially reflections, is to achieve a balance one part of the image should not heavily outweigh the other. You can achieve this through symmetry, as shown in the above image of Maroon Bells.
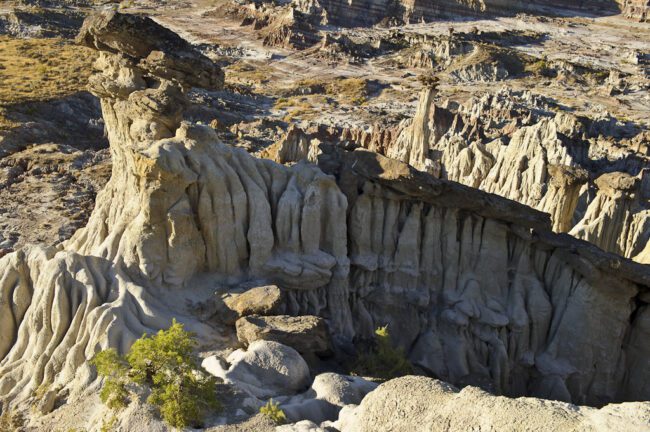
- If you have trees, single bushes or other objects in your corner frame, try to either fit them into the frame, or exclude them completely there will be situations when it is too difficult or impossible to do that, but try your best.
 A desktop wallpaper version of the above image can be downloaded from here.
As you can see from the above image, I did fit the bush in the center into the frame, but could not fit the one on the right, so it is cropped. There were too many small bushes and plants in the area and it was just impossible to fit them all. But since my center of attention is the sky together with the strange formations on the right (which fit the frame), the bushes hopefully do not look too distracting. - Carefully frame your shot in the past, I never paid attention to proper framing I would just point my camera and take a picture, without putting much thought into what I was doing. I ended up with thousands of useless pictures It is very unfortunate, because I had very unique moments with beautiful sunset, cloud formations and good light, but just because of my own errors, those pictures are all useless. Learn how to properly frame your shot and think before you press the shutter. Dont just point and shoot like you used to before.
- Dont get stuck with horizontals I personally prefer taking horizontal images of landscape, but I do take a lot of verticals as well. In some cases try doing both and give yourself a chance to choose which one is better later. Sometimes vertical shots communicate better than horizontals.
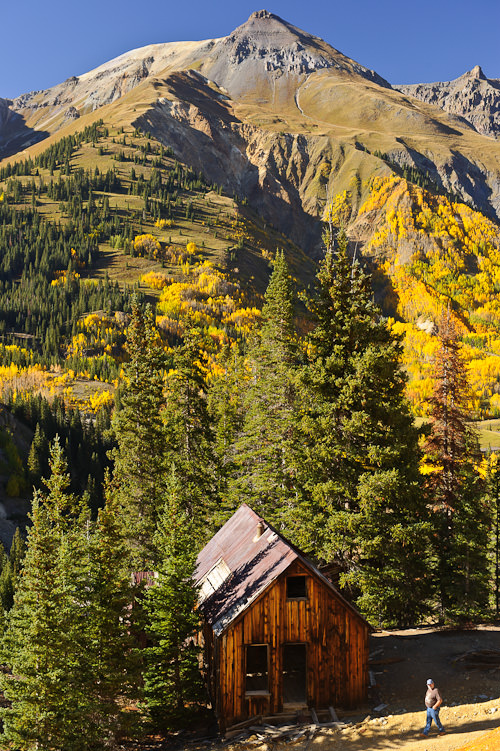
- Dont let tall trees and other large objects touch the frame leave some breathing space. Even very little free space is better than none. Take a look at this example:
 The tip of the mountain is almost touching the top frame. If I had some clouds that day, I would have probably included more of the sky, but I purposefully reduced the sky to have the viewer concentrate on the old building with the walking man. Note that I still left some space in between the mountain and the top of the frame though.
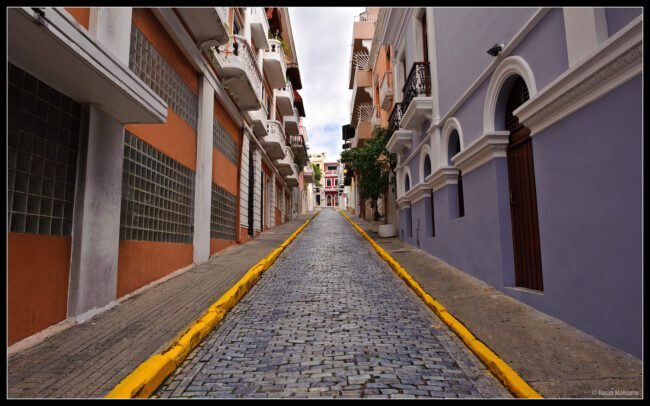
 - Be careful when using ultra-wide angle lenses ultra-wide angle lenses always make the foreground objects much larger than they are and make the background look much smaller. For example, take a look at this shot:
 I captured the image with the Nikon 14-24mm f/2.8G lens @ 14mm on full-frame Nikon D700, which is an extremely wide focal length. If I pointed the camera down just a little more, you would have seen my shoes. As you can see, the foreground looks gigantic compared to the objects just 10-15 feet away. The tall building on the horizon is barely visible and insignificant.
When using such extreme wide angles, it is typically best to approach your subject close to force the attention of the viewer on that object, rather than shoot from a distance. If you shoot from a distance, everything will look small and the objects close to you will look too big in comparison. Try not to use ultra-wide angle lenses too much for landscape photography. I find focal lengths above 28mm on FX and 18mm on DX to work best for my landscape photography. - If you include animals in your shots, try to capture them in different poses animals often move towards the same direction. Wait until they change their poses so that they are not facing the same way and then take a picture.
- Keep it simple avoid adding too many distracting and busy elements to your images. Sometimes keeping it simple is the key to a good composition.
- Pick diagonal lines rather than straight vertical or horizontal lines diagonal lines are much more dynamic than straight vertical/horizontal lines:
A desktop wallpaper version of the above image can be downloaded from here.
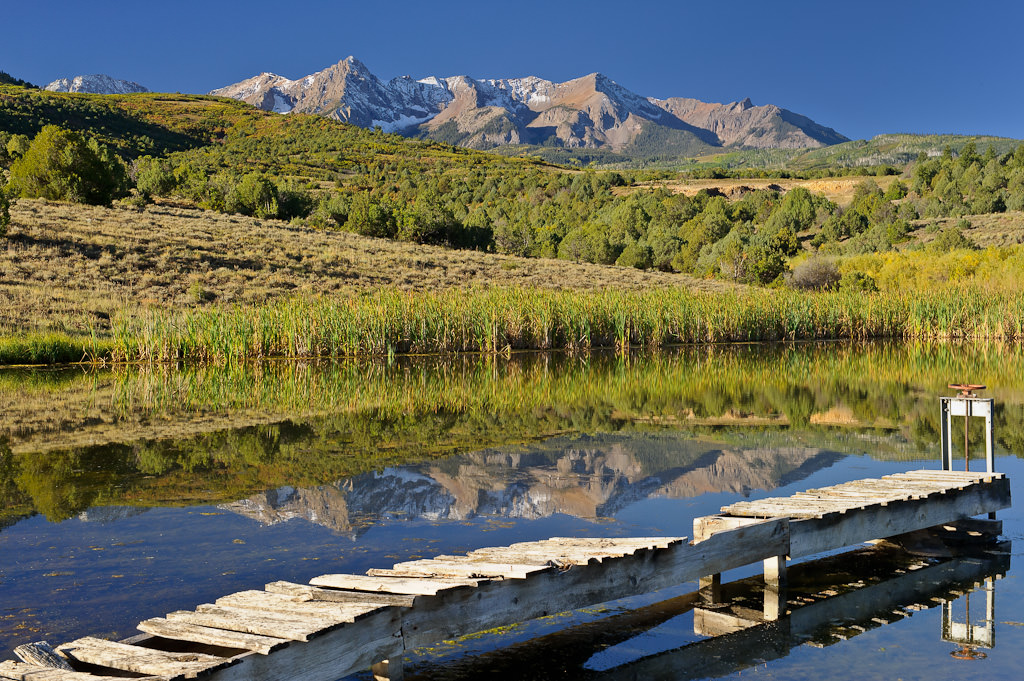
For this shot, I had to angle my camera so that the line runs diagonally. - Try multiple lines sometimes a mix of straight and diagonal lines at different angles can give a different feel to the image:
 In the above shot, I have a bridge that is positioned diagonally, while the lake line cuts straight through the middle horizontally.
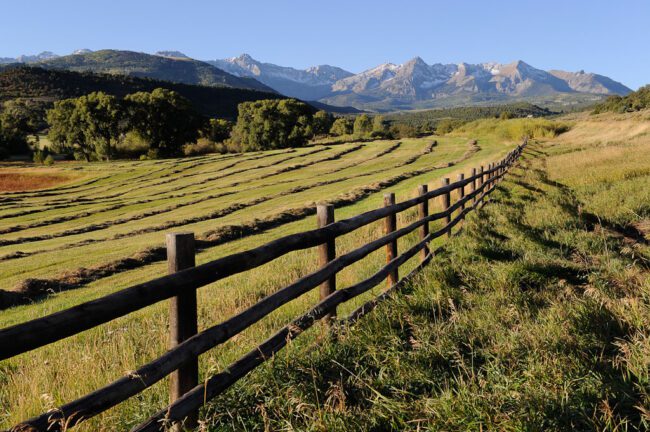
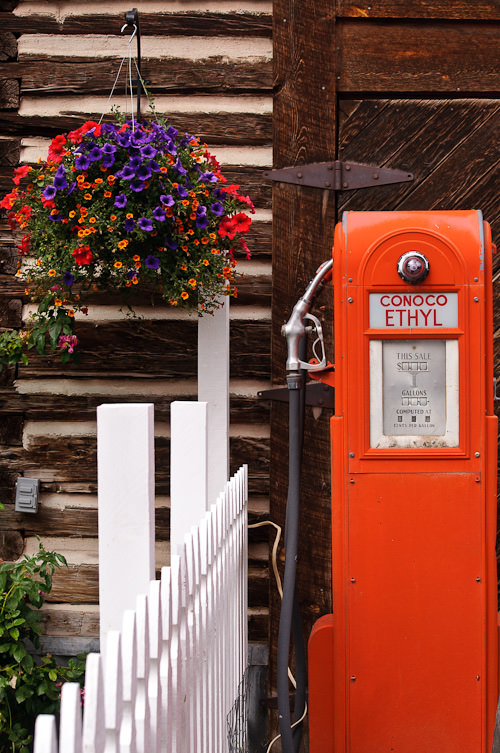
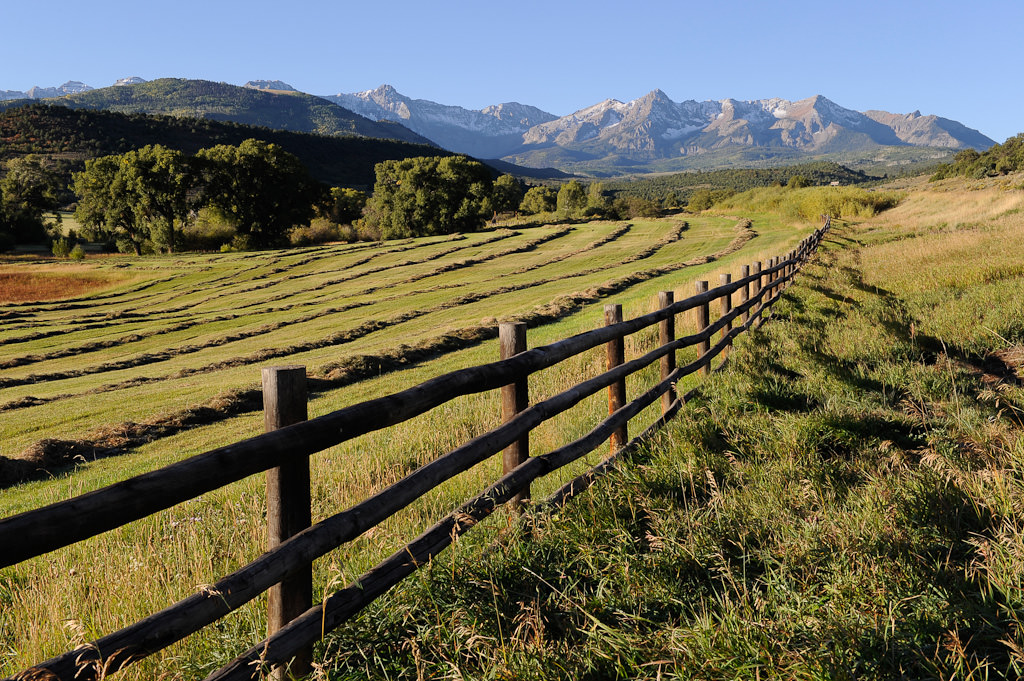
 - Have a sense of depth with diagonals having a sense of depth in your images is important you do not want the images to look very flat. A 3D look is always better than a flat 2D look:
 Here, the diagonal fence gives some depth to the image, showing the viewer that the building with the gas pump are located at the end and stacked closely to each other.
Here, the diagonal lines are creating a tunnel with lots of depth to the image. - Get close this is different than getting close with an ultra-wide angle lens. If you have a zoom lens, see if you can improve your composition by zooming in closer and eliminating other objects around the subject. Sometimes having a telephoto zoom lens helps to achieve this.
For the above shot, I zoomed in to 100mm with my Nikon 70-200mm f/2.8G VR II lens to focus on the slightly curved diagonal branches. With a wider lens/shorter focal length, I would have captured a lot of other objects around. - Get those S curves as I have already pointed out above, curves always look better than straight lines, especially the S curves:

A desktop wallpaper version of the above image can be downloaded from here.
Here is another S curve:

- Recurrence of objects/elements another interesting concept that you can apply to your composition, is recurrence of objects or elements in your photograph. The element of recurrence itself is not always important you can do this with fences, electric poles, trees, buildings, etc. Here is an example of recurrence:
- Try taking panoramic images rather than being stuck with square or rectangular images, try shooting panoramic images. You can either crop images to be panoramic (see below on cropping) or you can shoot a bunch of vertical or horizontal frames and then stitch them together in Photoshop or other third party software. I have a detailed guide on how to photograph panoramas and you can find plenty of information on how to properly photograph panoramas there.


4.3) Post-Processing Technique
Post-processing is an integral part of landscape photography. I remember once seeing a small photography contest online and one of the rules said to submit only original, untouched photographs. Apparently, the contest organizers thought that post-processing images was an unfair practice and they did not want one person to have an advantage over another, just because of better Photoshop skills. I personally think that such rules are silly. Is it unfair when one photographer can use Photoshop better than another? Ansel Adams, the master of landscape photography was a darkroom magician. He spent countless hours working on his images and I am sure that if he was alive today, he would have loved Photoshop! How are Ansels post-processing skills in the darkroom different than someones Photoshop skills? Knowing how to post-process images is a big part of every photographers life today. And thats a fact.At the same time, you hear many photographers say do everything right in camera. I mostly agree with this statement when it comes to landscape photography, it is best to minimize post-processing efforts and do as much as possible in the camera. It is one thing to photograph a scene with a heavily overexposed sky, thinking you can fix it later in Photoshop and another to use filters and other tools to expose the sky at least partially right, so that you could finish it up in Lightroom/Photoshop. Some things like the effect of a polarizing filter cannot be replicated in post-processing. Other things take enormous amounts of time to fix. Just learn to balance your workflow and you should be in good shape.
4.3.1) Cropping
When it comes to cropping, I highly recommend minimizing your cropping efforts for landscape photography if you shoot digital. The main reason is that cropping results in smaller images, which means smaller prints. If you are just posting images for the web you can certainly crop as much as you want, but what if somebody gets interested in buying a large print of your photograph after seeing it on the web? Thats where cropping might hurt your image. If you shoot medium format or large format film, you have a lot more resolution, so slight cropping is generally not a problem. But I would still frame your images right from the very beginning, instead of having to resort to cropping later. The type of cropping you certainly want to avoid, is cutting verticals out of a horizontal image and vice versa you will lose half of your resolution (if not more) by doing that. Aligning and leveling images also results in cropping and losing resolution. Therefore, as I have recommended above under composition, you should always align and level your camera before taking pictures.Other than that, very slight cropping to improve your composition and remove clutter is quite normal. I personally do crop some images when necessary as well.
4.3.2) Sharpness and why it is important
While sharpness does not matter as much for certain types of photography, it certainly carries a lot of weight in landscape photography. A sharp landscape image is always better to look at than a blurry or a fuzzy image it communicates good technique by the photographer, gives a more realistic feeling to objects and just looks more pleasing to the eye. Having good sharpness across the frame requires the following:- A good lens that is able to resolve a lot of detail and is sharp from center to corners.
- A high-quality film or digital camera with plenty of resolution.
- Good camera technique by the photographer that can set proper exposure, acquire correct focus and eliminate camera shake.
- Good post-processing skills by the photographer for adding additional sharpening for printing/publishing.
If you have the right gear and camera technique, sharpening images in post-processing is easy. Take a look at my article on how to sharpen images in Lightroom to get an idea. You can also use special plugins in Photoshop for selective sharpening and they also work great.
4.3.3) Post-processing images
Other than sharpening and cropping, there are many different ways to improve your photographs. You can darken the sky and make it look more blue, you can saturate some of the colors more, you can add more contrast to your images, you can convert images to black and white and much much more. I am not going to go through all of these techniques, since there is just too much to cover, but you can get started by reading my Lightroom landscape photography post-processing tutorial, where I share some simple techniques to make your landscape photographs look better without using Photoshop. You can find some other tutorials in my growing Post-processing tips for Beginners section.Here are some additional post-processing tips for landscape photography:
- Be careful with dark shadows in the scene while shadows are a normal fact of life, dont let the shadows steal your viewers attention. Make sure that shadows do not occupy too much space, or they will spoil your image. Also, if your shadows are too dark, try to lighten them up either by adjusting the exposure or in post-production. In Lightroom, you can use the Fill Light feature to add some light to the shadows. Dont overdo it though you still want shadows to look like shadows. Thats one of the biggest problems with HDR photography the shadows rarely look real. Here is an example of a shadow eating up half of the image:
Although I did brighten up the shadows a little, the image still looks unbalanced and the shadows are too distracting to the eye. - Dont oversaturate your images it is very common for photographers to purposefully oversaturate images. I personally used to oversaturate images a lot in the past. Now, when I go back and look at them, I realize that I should have taken it easy on colors. In some cases, you might actually need to desaturate some colors or an entire image. Here is an example of an over-saturated image that I shot a couple of years ago:

It is actually not just over-saturated, but also underexposed. Sometimes underexposing can result in too much color saturation as well. Even some of my recent images look over-saturated to me, so I have been actually decreasing saturation levels in Lightroom. - More tips coming soon!

4.3.4) Monitor Calibration
When you work on your images, make sure that your monitor is calibrated. You do not want to be editing images using a non-calibrated monitor, because your colors might be way off. I have an article on how to calibrate your monitor, in case you do not know where to start.5) Light
Lets move on to talk about Light the third most important element of landscape photography. I know many photographers will argue that it is the first in terms of importance and I agree. Although photo equipment and skill/technique are certainly important, no photograph can look good without beautiful light. Portrait photographers can work with pretty much any light, because they have powerful external flashes that can imitate natural light. Landscape photographers do not have such luxury we have to work with the available light all the time (except when painting some foreground objects with flashlight).What is the best light? What are the best times of the day? Or best times of the year? Lets see if I can answer some of these in more detail.
5.1) Sunrise and Sunset
The best landscape pictures are either taken at sunrise or sunset. I personally prefer sunrise/early morning light than sunset/late afternoon light, because it seems like there is less haze in the morning (obviously depends on many factors, pollution, wind, wildfires, etc). But it all depends on the direction of the subject I want to photograph. In Colorado, some mountains are best photographed at sunrise, while others are best photographed at sunset. Before you decide when to be at a particular location, I would highly recommend scouting the area first. Mid-afternoon is a good time to scout and estimate where the sun will rise and where it will set. I personally rely on some apps for my iPhone to tell me when the sun rises/sets and where in the horizon the sun will show up and where it will set. My favorite app is Focalware I simply set my location and it tells me everything I need to know.5.3) Best Light
When people ask photographers about the best light, the typical answer is early in the morning or late afternoon, with the worst light at mid-afternoon. While it is true for many locations around the world, the statement is not necessarily correct for some regions. For example, if you live in Nordic countries or shoot in Antarctica, you could shoot all day long with great light. How? It is all about the angle of light in relation to the sun. Direct sunlight that we typically see in the mid-day is the worst, because it creates straight and ugly shadows. But if sunlight is always at an angle, there is no bad time for taking pictures. Sunrise and sunset times are the best, because you see the most amount of colors. So if you asked me when the best light is, I would say it depends on where you are located.5.4) Seasons
What about seasons? Again, it depends on where you are. In Colorado, for example, mid-summer is a great time for landscape photography because of wildflowers that bloom in mid-July at high altitudes. In other places, summers are horrible due to heat, too much haze and harsh light. Winters in Colorado are typically hard to photograph due to harsh weather, snow, ice and dangerous road conditions. And yet winters are the best in terms of haze and angle of the sun. Spring and Fall are typically my favorite seasons to photograph landscapes everywhere, not just Colorado. The fall season is something you do not want to miss, especially in places with lots of non-evergreen trees. Some trees and plants go through dramatic color changes. For example, aspen changes its colors several times before the leaves fall off from dark green to light green, then from light green to yellow, then from yellow to red. In some cases you might even see brown leaves, if there is no wind.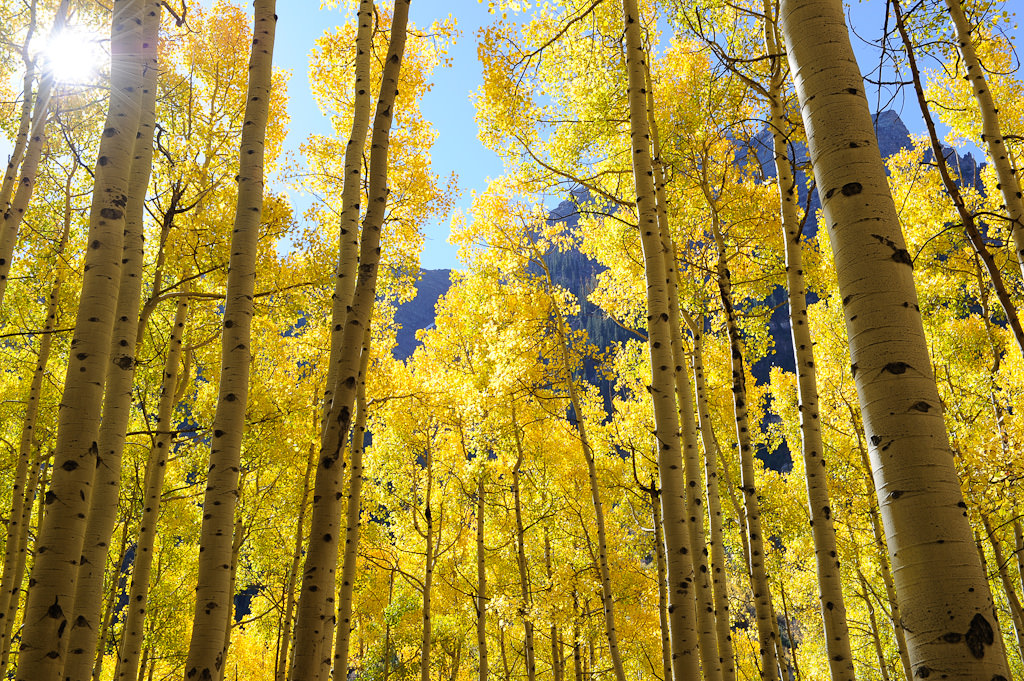

A desktop wallpaper version of the above image can be downloaded from here.
Spring is also great in many ways, with fruit trees having the most beautiful blooming season:

This article is a work in progress I will be adding more information to it in the future.
http://mansurovs.com/landscape-photography-guide
 Recent Articles